My Gear for a Winter Great Range Traverse
What I learned during preparation, training, and practice for the Adirondack Great Range Traverse.

I learned a lot during my preparation, training, and practice for the Adirondack Great Range Traverse. For this post I’m going through my gear decision making process and reviewing how it turned out. This will certainly be helpful for me to record it, but I hope you find it at least interesting, if not helpful too.
Chosen Style
Some mountaineers climb mountains in a “style” they call “alpine style”. That is to say, they don’t fix ropes, they travel fast in small parties of 2 or 3, they don’t use oxygen. In short, they do it “clean”.
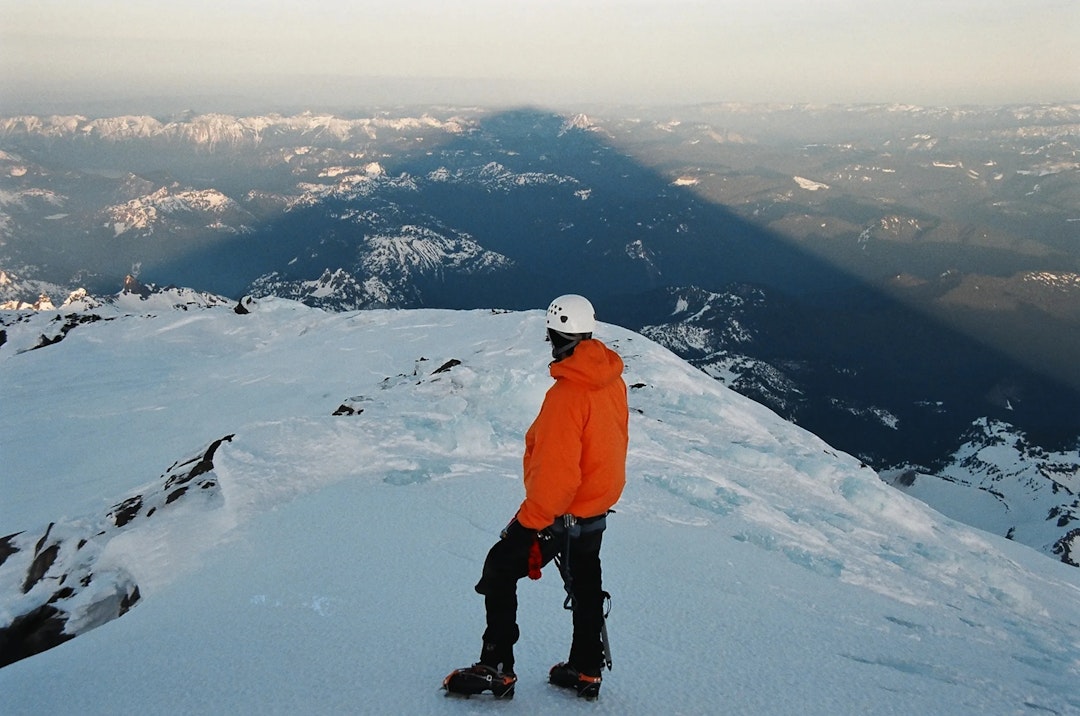
My style for the Great Range Traverse (GRT) was similar, albeit at a lower elevation and less technical terrain than most alpinists. I was committed to moving quickly, without overnight camping gear, and doing it solo. I also wanted the full range of technical conditions that the Adirondacks had to offer to push me to test my full range of skills.
Even though I was committed to doing it without overnight gear and without a partner, I wanted to be comfortable with my safety margin. I wanted to be happy and having fun without spending mental energy worrying about dying up there.
I know I could have gone lighter, but I would have to take some additional risks and given up safety margin that was not consistent with my style. In the end my pack weight (28 lbs) or boot weight were not limiting factors at all. In fact, since I had my crampons on and my tools in my hands for most of the climbing, my pack was quite light.
I’m happy with the decisions I made (for the most part … see below). I never felt sketched out there on my own and I was able to optimize for the kind of objective I wanted this to be. I wanted to use the Adirondacks, in all their winter glory, to push me to find gear, skills, and experience that I could take with me anywhere in the world.
I got just that.
Mountaineering Boots
I use the La Sportiva Nepal EVO ($510 new). I originally got them in 2012 as a replacement for the plastic boots I had been using for ice climbing and general mountaineering in the Cascade Mountains. Since then, I’ve also put the EVOs into service as a winter “hiking” boot for long days, or days where I thought I could use more technical climbing support. Being pressed into service as a hiking boot is something the plastic boots would never have been able to do.
The EVO is rigid (the sole does not bend) which makes them great when going up or down steep terrain in winter. They also have heel and toe bails which allow the automatic crampons to clip on, making it much easier to get crampons on and off, and provide a more solid connection to the boot.
The rigid soles have a “rocker” shape, which allows me to have a somewhat normal hiking gate in a rigid boot. That said, I’ve noticed that my hip flexors painfully wear out faster in these boots than with proper hiking boots, but only when I’m hiking on flatter ground.
My feet are heavier with these boots than with my hiking boots. But, most of my time on the GRT would be on steep terrain, much of it covered in water ice, where these boots excel with the technical crampons (below). The weight was worth it a million times over.
Crampons
I decided to use my Grivel G14 (~$200 new) technical ice crampons for the GRT. Again, these are heavier than the general mountaineering crampons that most of us use when hiking in the Adirondacks. However the technical capabilities of the specialized front points in ice and rock would give me extra safety and endurance margin that I needed. Plus, I wanted the easy on/off of the automatic bindings.
Microspikes
Microspikes have changed the game in winter hiking. Their use wasn’t practical until the famous Kahtoola “reds” came along. When it’s too sketchy to bareboot, but crampons will smash up your feet, microspikes are just the thing. This usually happens on flat terrain with stretches of ice or hard packed snow.
On the GRT I used mine from the Rooster Comb parking lot until I got into deep snow on the northern horn of Lower Wolfjaw. On the descent from the trail junction at Marcy I barebooted on packed snow all the way down to the DEC outpost at Johns Brook. Barebooting is more comfortable than crampons, snowshoes, or even microspikes, so I do it whenever it’s safe and efficient.
At Johns Brook the trail had melted down to the bare ice which continued for the last 3 miles to the parking lot. I couldn’t stand on it with bare boots, let alone hike on it. I don’t know how I could have made it over the iced up trail for those last 3 miles without the microspikes. Crampons would have destroyed my feet, and snowshoes wouldn’t have held that hard ice.
Snowshoes
I recently (within the last 3 years) replaced my red plastic MSR snowshoes with MSR Lightning Ascent.
On the GRT I got my snowshoes off the pack and put them on only twice. Once when I first got into deep snow approaching Lower Wolfjaw, and another time when I had to break trail out of the deep col from Bain to Saddleback.
I had to posthole through some deep drifting snow in each col I went through between peaks, but I’m not sure snowshoes would have helped me get through it much more efficiently. Plus, every snowshoe change takes 15 minutes. This would have added 30 minutes to each col crossing. I didn’t want to give up that much time for what seemed like little gain. To anyone who followed my tracks; sorry for postholing. Normally I would have left you a well packed snowshoe trail!
On a side note, the MSR Lightning Ascents seem to offer no traction on steep and loose snow. I try the heal lift up or down, dig the toe teeth in … nothing. This is probably true of any snowshoe, but I seem to remember having better luck with the MSR Evos. Anybody feel the same way?
Ice Axes
In the photo at the top of the page I have my short tool and my longer mountaineering axe displayed. I ended up changing my mind the night before and bringing my 2 short technical ice tools instead. I have a pair of Petzl ERGO I got off ebay 10 years ago ($360 each, new. Much cheaper from ebay or consignment).

These tools have always been my go-to for sport ice climbing. However, when I set off for Rainier the second time, I had gained enough experience to know that having 1 short technical tool was good to have with the mountaineering axe. So, I brought one of my short tools and and it was a game changer.
It’s important to understand the difference between mountaineering axes and technical ice tools. Mountaineering axes are longer, and usually have an adze in the back instead of a hammer. Most importantly, the pick on a mountaineering axe is not made to stick into ice, believe it or not. It is made to drag into hard snow so you can stop sliding down the mountain if you happen to fall on hard, steep snow. Conversely, on a technical ice tool, the reverse curve pick is designed to be thrown into ice or snow and hold tight.
On the day before I started the GRT I realized that the long mountaineering axes that most of us typically use in the Adirondacks are almost useless there. I’ve managed to file a tip on the pick of mine to get some bite in the Adirondack ice, but it still popped out on me on a recon trip when I was climbing the pile of rock and ice leading up the south side of Saddleback. It was enough for me to lose confidence in it.
On my GRT day I would have to descend both the famous Gothics cable route, and the rock band off Saddleback. I decided to lean on my technical ice climbing experience for the extra safety margin and replaced my axes with the ERGO climbing tools.
It was the right decision. I was soooo happy to have my trusty little friends there with me on the sketchy parts. The ice tools solved at least one or two critical situations on every peak I climbed, save for Marcy when I was crawling on them instead ;-)
Stove
I took a Jetboil MiniMo ($135) with a small gas canister. My use case was to melt snow to replenish my drinking water supply and also warm up my heavy cream and butter with Carnation Instant Breakfast to lift my spirits at “lunch” break.
I have had problems with butane/propane gas stoves in cold temperatures. The gas compresses in cold temps, so there is not much pressure forcing the gas out the nozzle. A few weeks ago in temps around zero F, it took painfully long time to melt 16oz of water I desperately needed.
Any tips on getting a gas stove to work in below freezing temps would be much appreciated. I’ve heard of carrying the canister in a jacket pocket to keep warm, which I guess is a possibility. I ended up unscrewing it, dropping it in the water I had managed to warm up, then screwing it back on and starting again. My liquid fuel stove might be worth the extra few ounces at that point.
Puffy Jacket
This is a big one. Probably deserves it’s own post, but here we go.
In the Northeastern US there is always a debate between having a down puffy or a synthetic one. For me, this debate has been settled. Here is the long explanation.
I was first introduced to something called a “belay” jacket in 2003 when prepping for a trip to Alaska. We got hooked up with Wild Things Gear in North Conway, New Hampshire, and when word got around to what we were up to, we had a room full of experts handing us advice and stuff to put on our shopping list. One of them was this belay jacket from Wild Things. It had piles of synthetic insulation under a robust Epic fabric shell. A local guide, who had experience in Alaska insisted that I pick one up, and get it extra large so I could throw it on over anything. The Wild Things rep gave me a great deal on the ugliest orange one they had, and I took it. This may have been the single best gear advice I’ve had over all my years in the mountains.
The XL is so big on me that I wear it like a dress, but putting it on is like crawling into a bomb shelter. It’s not light, but the first time I had on in a full winter weather assault, I swore I’d never allow myself to be in another situation like that without it … and I haven’t. That jacket has saved my butt more than a handful of times. It not only made bad situations OK, but saved my life.
Since then I’ve learned a lot more about the famed belay jacket class, especially through the writing of Andy Kirkpatrick. He has written about staying warm in extreme conditions a lot, and recently updated his treatise on the belay jacket.
At the end of last winter I finally needed to replace my Wild Things belay jacket. Unfortunately, they don’t make them anymore, so I was out searching for a new friend. Somehow I threw everything I learned about this jacket out the window and tried to lighten my pack weight by getting a lighter down jacket from Outdoor Research called the Floodlight Jacket.
The OR down jacket is fine, but it’s no belay jacket. It has an advanced shell that is mostly water resistant and it is pretty light. However, the first time I had it out, I realized it would never be able to be elevated to belay jacket status. I couldn’t trust this thing to save me if I stupidly found myself in a sub zero gale on an exposed mountain, which is a situation I seem to be attracted to like a magnet.
When I throw the down jacket on over a sweaty torso (which I almost always do) it seems to lose half it’s insulation. If I proceed to climb or hike in it for a bit the moisture off my body renders it almost useless. In wet snow it gets reduced to a soggy rain shell at best.
Even so, I decided to bring the OR down jacket on the GRT to save a few ounces. That was a bad decision. I was lucky, and got away with it, but I don’t like to be lucky in the mountains.
So, I’m shopping for a proper belay jacket for next season as we speak. I’m leaning towards the Patagonia Hyper Puff (what used to be the DAS Parka), but also considering the Rab or Montane that Andy Kirkpatrick recommended.
Get a belay jacket, but don’t get a down one. Just because everyone else does, doesn’t mean you should too.
Mitts and Gloves
I don’t really need mittens in most cases, but I always bring them, and always glad that I do. I have a pair of simple Outdoor Research water resistant, non insulated shells (GoreTex), and both synthetic and wool liners I wear inside them. When temps are below 10F on the summits I have both the wool and synthetic liners in them. I can also throw the shells on over my gloves if needed.
I always leave the car with mittens on, and then remove them and carry them in one hand as I hike, otherwise bare handed. I don’t use poles, so this is not an issue. I slip them back on when I need to crawl under some blowdown, after fiddling with cold snowshoe buckles or crampons, or if I generally start cooling off. And, I use them to blow snot rockets and wipe under my nose. Versatility.
I also carry a pair of Rab Talon ($135) gloves for cold weather and a simple pair of uninsulated Outdoor Research gloves for mild weather.
On the GRT I had the climbing tools in my hands almost the whole time. I have not had much luck with the uninsulated OR gloves and steel climbing tools. I frost bit two fingertips after changing to crampons and using ice tools to climb the pile of rock and ice up Saddleback in subzero temps this season. The steel tools suck the warmth out of my fingers through uninsulated gloves.
But, this is where my mittens come into play. If my gloves fail at any point, I can fall back to the mitts, and like my belay jacket, I know they’ll stand up to anything when I most need them. They are worth the weight. And, over the years I’ve become quite adept at handling ice climbing tools, carabiners, and ropes with mittens on. It’s a worthy skill.
Helmet
I’m the weirdo wearing a helmet while hiking in the Adirondacks. I always have my climbing helmet on when I’m out solo. I’ve been in some pretty dire situations, both with my own climbing party, and assisting in rescues with others, that I understand the importance of initiating a self rescue, spending the night out in a really bad place, or dragging my ass back out of there no matter how long it takes. I feel comfortable that, in most situations, I can find a way to get myself out of trouble.
All that experience and mental fortitude goes into the waste basket if I ever suffered a head injury. So, when I’m out alone, the helmet goes on before I leave the car and does not come off until I’m back in the car. I’m so used to having it as a climber, it really doesn’t bother me at all.
I have a lightweight cyclists’ hat I wear under the helmet (complete with pony tail hole), and I get all my jackets with an “over-the-helmet” hood. If I can’t pull the hood over the helmet, the jacket is not for me.
Water Bottle
I only carry 1 liter of water with me no-matter the objective. If I’ll need more than that, I carry my stove to make more out on the trail. The stove weighs less than a bottle of water, and I can make much more water with it if I need to. I’ve also had the stove out to assist other parties in a rescue situation where giving them my water would have inhibited my ability to help.
Sunglasses
Snow blindness is a sunburn on your retinas and it can happen anywhere there is open snow and light, even the Adirondacks. I’ve come back with foggy eyes enough times to make sure I have them and wear them unless I’m in the dark recesses of an Adirondack forest.
Sleeping Bag
There is no sleeping bag pictured in my gear photo, because I didn’t bring one on the GRT. Normally I bring my Nemo Sonic 0 degree (2lbs 10oz) on winter outings, even if I don’t plan on staying overnight, because it could save my life, or someone else’s.
On my Great Range traverse I decided I was comfortable without it. This was a bad decision. With a proper belay jacket, I would have been fine. But if things had gone bad, and all I had was that collapsed down jacket to rely on, I would have been up the creek.
From now on I’ll make sure I have a proper belay jacket. My safety margin without the sleeping bag would have been acceptable if I had that jacket.